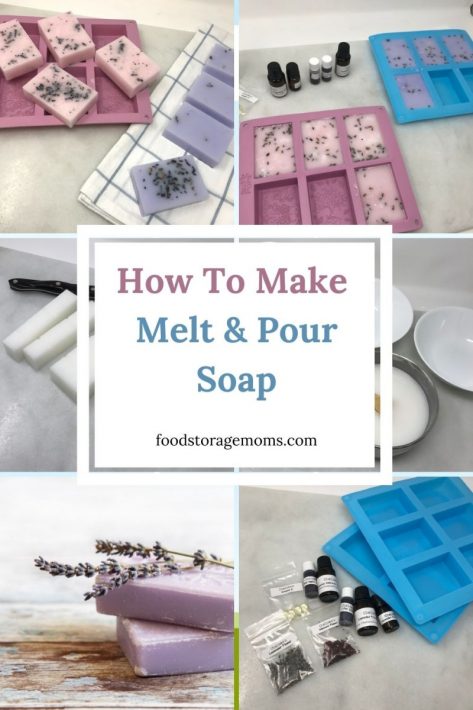
How To Make Melt And Pour Soap

I have tons of pictures today to show you how to make melt and pour soap. My goal has been to learn how to make my own bars of soap. Now, I’m not talking about making it with lye, I wasn’t interested in doing that right now.
This is one of the easiest and safest ways for me to make it. It’s a cartwheel moment for me! Anytime I teach myself how to make something I’ve been hesitant to try, I’m super excited with the results. I then wondered why I hadn’t tried making melt-and-pour soap before.
I’m for sure a picture person, I have to have lots of pictures to see how to do things. So here we are my friends, with several pictures to show you how to make it step by step. I wish you could smell the room where I’m making these, oh my gosh! It’s not too strong, but just right.
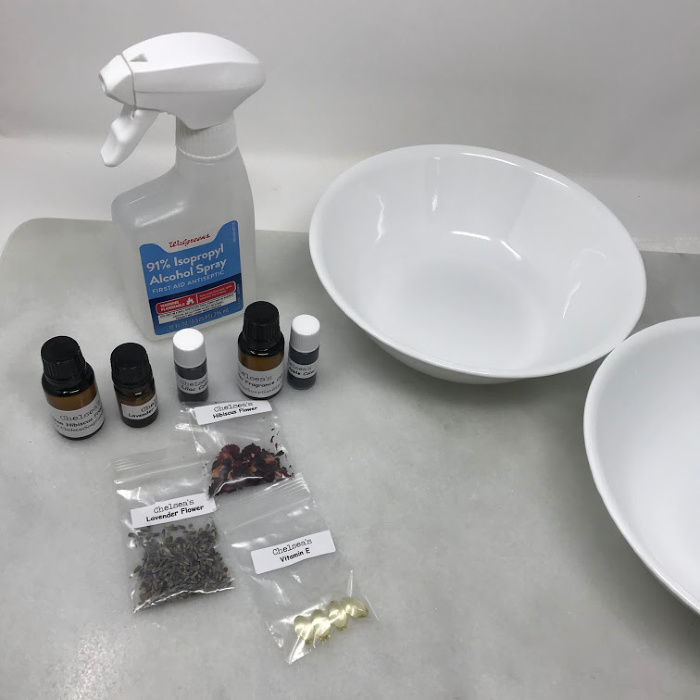
Melt And Pour Soap Ingredients
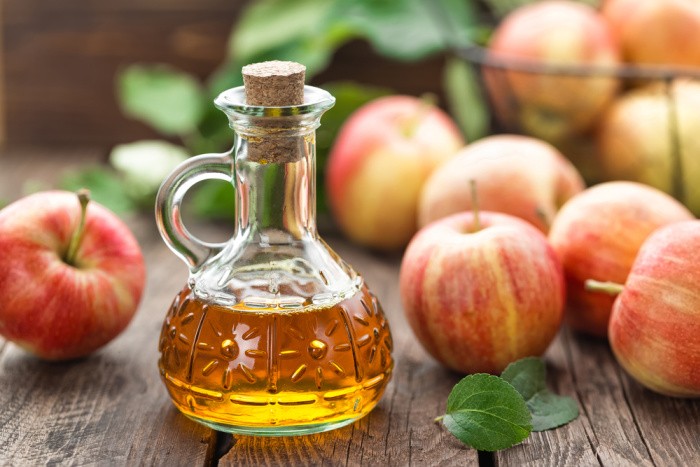
This is what came in the box that I purchased from a Hibiscus & Lavender Set
- 2 one-pound sections of goat milk melt and pour soap base
- 1/2 ounce Lavender Fragrance Oil
- 1/2 ounce Hibiscus Fragrance Oil
- 5 (ml.) Lavender Essential Oil
- 1 packet of crushed Hibiscus Flowers
- 1 packet of Dried Lavender Buds
- Lilac-Liquid Soap Colorant
- Apple Red-Liquid Soap Colorant
- Vitamin E Capsules (I didn’t use these)
- 2 Bar Soap Molds (plain/no design) I purchased 2 others
- 2 Pipettes for Measuring Fragrance Oil
- Complete Soap Making Instructions
Equipment Needed:
- Double Boiler or Microwave
- Double Boiler Pan
- Large Glass Container for microwave
- Wooden Spoon
- Candy Thermometer (I just winged it and did not use a thermometer)
Melt And Pour Soap Steps
Gather all your equipment so you don’t have to look for it. Now’s the time to be thinking about what color, if any, you want to make your soap. If you want a fragrance now’s also the time to decide which one. You can use the pipette (I forgot to put it in the picture) to measure the amount of fragrance. I just poured it in ever so slowly. Slowly pour the colorant into the bowls below or it may be darker than you were expecting.

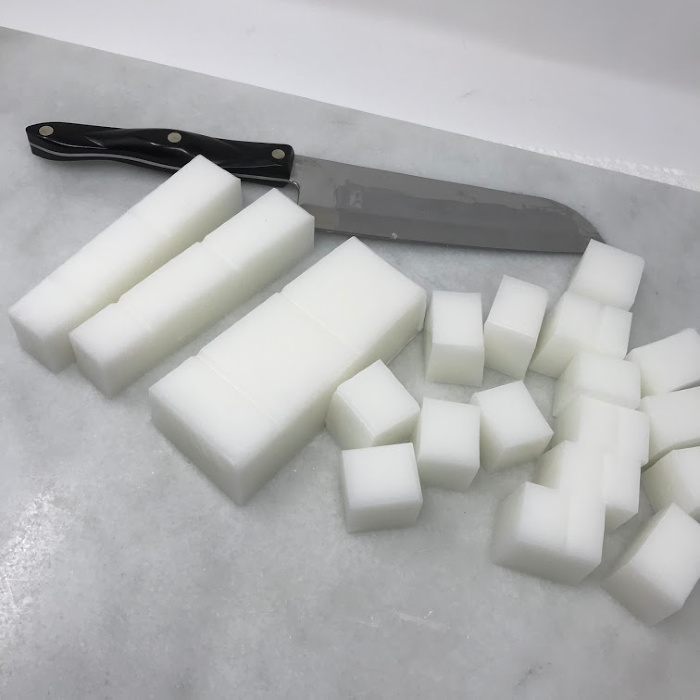
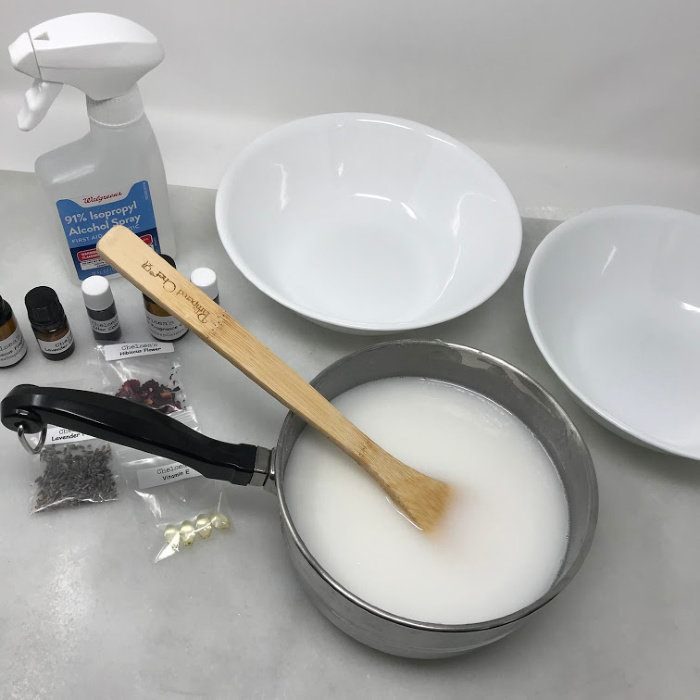
Grab A Good Knife To Cut The Soap Base
It’s effortless to cut the soap bars lengthwise and crosswise. I wanted to be able to stir the chunks in the double boiler and have it melt a bit faster.
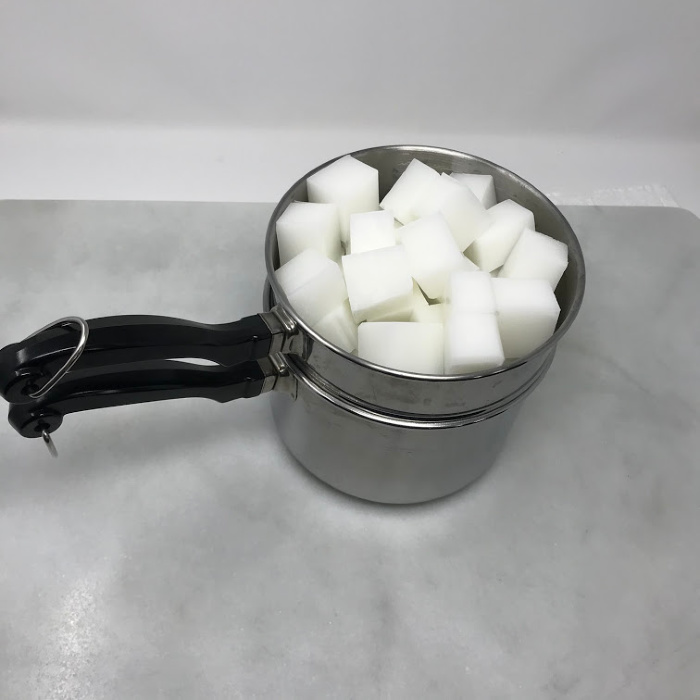
You can also use a large glass measuring cup to melt them in the microwave. I opted for the double boiler. Just fill the water in the double boiler and place the cubes in the upper part of the pan. Heat slowly, just until melted. If you choose to microwave it, start with 15-20 seconds at a time. You will need to repeat this often. DO NOT LET IT BOIL OR IT WILL RUIN THE BATCH. Soap will melt at 140 degrees and should never go over 160 degrees.
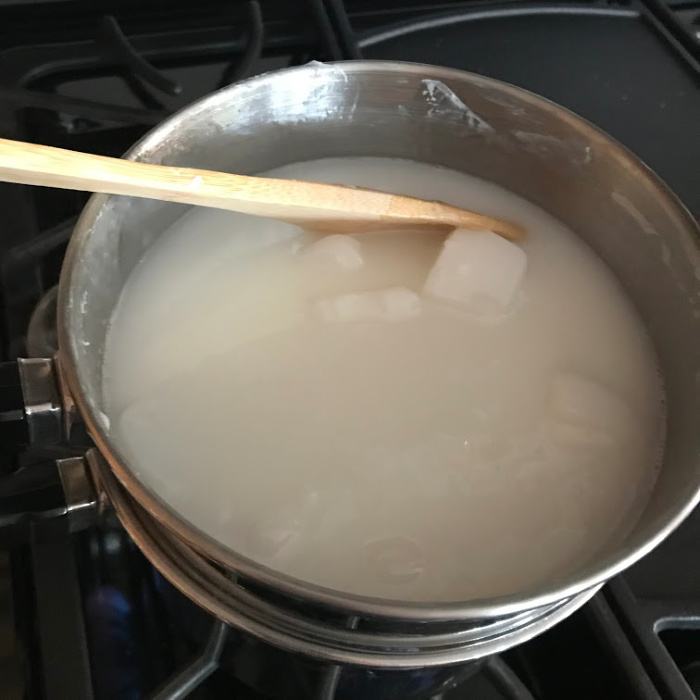
Melted Soap Base
This is what it looks like when it starts melting. I stirred it constantly over a low to medium flame on the stove using the wooden spoon.
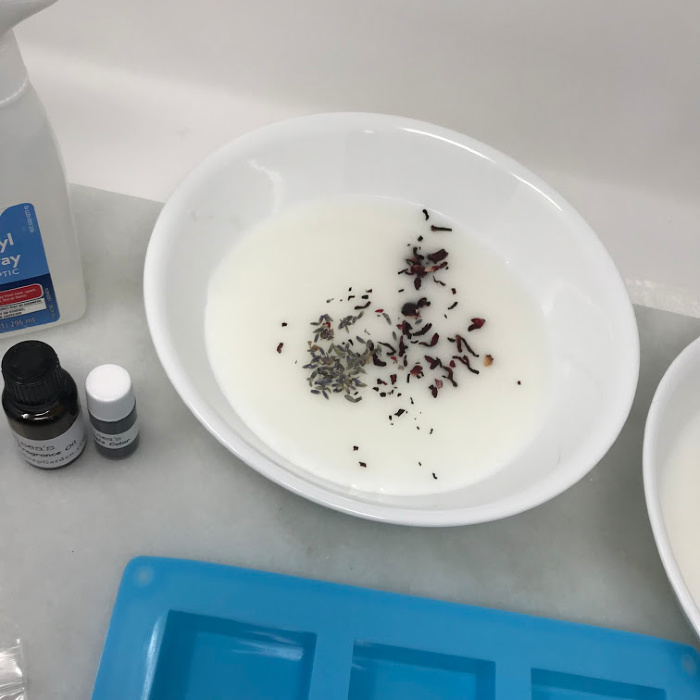
Mixing Bowls For Color & Fragrance
You can see the two bowls, one for each colorant, and fragrance. I wish I had had two wooden spoons. I had to wash the spoon in between the two mixtures.
Ready To Mix
You need to work rather quickly because the soap sets up very fast. It’s so fun to make, but I will buy the ingredients separately next time. It will be cheaper next time around.
Melt And Pour Soap Is Ready
Here is where you add the colorant, the fragrance, and the flowers. Please use a clean wooden spoon, and you must stir quickly because it starts setting up very fast. I actually stirred the flowers into the soap mixture because I have seen where it doesn’t adhere to the soap and falls off. You could also sprinkle some on top and carefully push it down a little in the bars. One tip is to use an alcohol spray to smooth the bubbles or ripples on top of the soap bars.
Melt And Pour Ready To Mold
I was afraid I would need something to pour it, but I didn’t. I just used the pan I melted the soap in. It was easy, I promise. Just go slow and it works. You may want to spray the molds with a little non-stick spray to keep the molds from sticking. Please note, I did not use any spray and they came out perfectly. The bars will be ready in about 2-3 hours. If they are stubborn wait another hour or so. This would be a really fun activity to do with children and grandchildren.
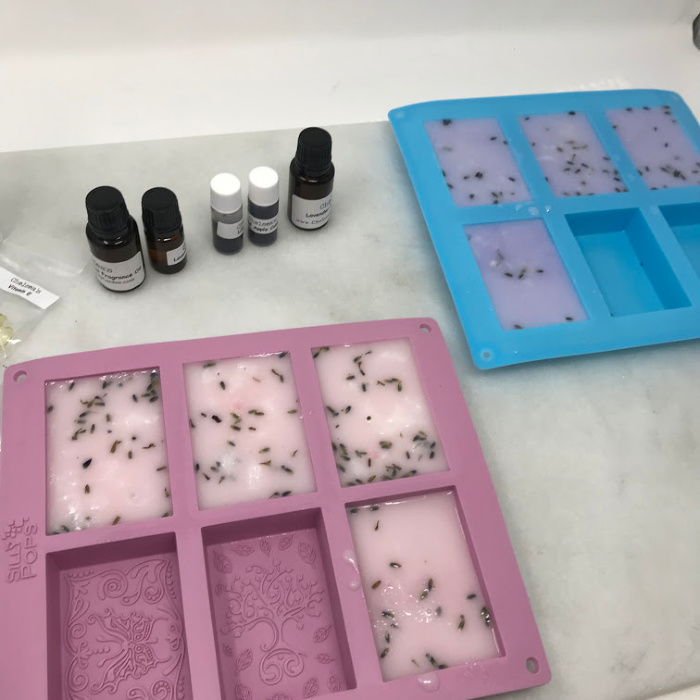
The Finished Product
Please let me know if you have made bars of soap, I love to hear from you.

How Do I Store These?
Spread the bars out on a shelf and lightly cover them with a clean piece of cloth to keep them clean and dust-free. Wait about 4 weeks and then you can gather the bars according to the fragrance and place them in containers. I layer my bars with a piece of cloth or a brown paper bag. Store in a cool dark place. They will stay good for about 1-2 years depending on the area where stored. Please keep them cool and dry.
Where To Buy The Melt & Pour Soap Base
Thank you, Amanda Sue, for directing me to this website to purchase the items we need to make these bars a whole lot cheaper: Bramble Berry
Final Word
Sometimes we have to step outside our comfort zone and learn some new skills. It may be melt and pour soap, or bread making. We can do this, I promise. Thanks for being prepared for the unexpected. May God bless this world.


Linda,
When I was a child on the farm in the ’50s, my parents made our own lye soap. Lye was leached from ashes remaining from the cast iron wood heaters that warmed the house in the winter. Tallow was rendered from the beef fat from our own butchered calves that we consumed. The soap was made in a large cast iron kettle outside over a wood fire. Once the saponification had occurred and the soap was partially solidified, my Mother would cut it into large bars and lay it out to cool. This soap was used to wash our clothes in a wringer washing machine and to wash dishes in a dish pan. It was not used for bodily cleansing because it was too strong and harsh. I wish I had documented explicit directions before they passed on. The only remnant I have of the process is the large cast iron kettle that they used. Those were the “good old days” that people long for. LOL!!! Have a great weekend!!!
Hi Harry, I’m like you, I wish I had written down more of my mother’s instructions and recipes. I didn’t realize growing up I would not only want them I would need them. We may all need to learn how to make soap with lye. Happy weekend! Linda
Thanks for the reply, Linda,
When I have a little extra time, I will do some research to see if I can come up with some directions/recipe for lye soap that approximates what my parents used. Hopefully, I will remember enough about it if I find similar directions. Will email you the results if I am successful as that is something for all preppers could have in their back pocket for dire circumstances. God bless you.
HI Harry, thank you so much! Linda
Linda, if you ever want to make soap with lye, email me and I’ll give you my phone number. I have been making soap around 10 years. I make bar, and liquid. My skin will not take any of the modern, commercial soaps.
Hi Janet, I will do that! Thank you!!! Linda
Linda ~ I love melt and pour soap bases. I have made soap this way for sometime now. Living in an apartment does not really lend itself to “going the old-fashioned” way!! But, I have made soap using lye and fat but it was outside and with an instructor. Melt and pour is easier! someone else has combined the lye and fat for us.
I purchase my bases at Hobby Lobby locally. I have used goats milk base, glycerin base and a couple of others that I cannot recall off the top of my head. I love that I can color them with soap colorant and scent (or not) them as I wish. You can also get such cute molds at the craft store to make “guest” soaps.
I must say, however, that I had to stop making soap this way. My friends and family told me to STOP! I was so into it that everyone got soap (along with some other handmade gifts). And they got these often!!
I do also believe that we need to have the basic knowledge of making soap from scratch if/when we have an event that will necessitate this skill. That being said, I recall one time camping that I ended up with a skillet (not cast iron) that had some very well cooked on food. It was going to be hard to clean for sure. So, what I did was add some oil (if I recall it was crisco oil) and some wood ash from the camp fire along with some water. I left it all sit over night and the next morning, I was able to swish it out with no effort at all. It is possible that just letting it soak with water might have done the same thing except I would have also had to use soap on it to make sure it was clean. With the method I used, I just rinsed and dried.
Hi Leanne, oh my gosh we have all learned different skills throughout our lives, I Love It! Linda
It’s just like candle making or other arts. Most of us see those things as hobbies, but if the world goes to crap, we’ll be feeling very fortunate that we learned how to make soap to keep ourselves clean and healthy.
Soap might be the one thing that helps us to maintain good hygiene and to cleanse a wound or provide clean clothing, towels and linens.
Besides I like meat, but I absolutely hate fat, so I’d rather render it for soap 🙂
Thank you so much for your post. I love making soap and really wanted to try out a melt and pour recipe, I am wondering if it will make a big difference between using the goat products vs using cow lard? I have had allergic reactions to the goat products. Or could I use glycerine? Thanks so much
Hi Millie, I’m not sure about the cow lard or glycerine. I have only made soap with goat products. It is so fun to make, you will be hooked! I would try a small batch. Keep me posted, Linda
Linda, I have taught classes on making soap (cold process and hot process) and also making herbal salves. You mentioned in the ingredients list that you did not use the capsules of vitamin E oil. Those act as a preservative to help your product last longer.
Also, there are MANY websites that teach you to make lye soap. I have books and printouts of websites that teach this. Just about any of them will tell you how to do it. Be sure you use the safety goggles and protective gloves. Other than that, you are good to go. Hot process soap gives more immediate and usable results. French-milled soap is soap that has been rebatched so it is sort of like melt and pour. Enjoy your soap and be proud of it!!!!
Hi Patricia, thanks for the tip on the Vitamin E oil for the soap. I was a bit overwhelmed learning how to make the melt and pour soap on my own. Plus I was taking pictures of the process. I just love learning new skills and teaching others. If I can do it anyone can do it!! I must say I got hooked on making it. Oh my gosh, the fragrance, the feel of the soap is amazing. I wish I could have taken one of your classes on making soap. You make me excited to try lye soap! You rock! Linda